
Hi again.
Back in June I shared images of a mini-album I'd begun using the heavyweight 'Artist Colours' cardstock as my covers [if you missed that post, just click on the link to visit it]. And now I'd like to share some of the inner pages which are a mix of divided page-protectors and regular double-sided paper leaves.

The album itself is a record of all the 9 times [and counting ...] that I've been on a long crafting weekend with a group of friends [including the 3DJean DT who are all making one of these albums too!] and it's a place for me to keep:
- lots of photos - we've all shared the photos we each have taken over the years - so we now have the same events from all angles!
- the menu [of Jean's fabulous home-cooking for each day!]
- our crafty itinerary - we're always forgetting just how much we get done in our 3 days away!
- plus ... lots of silly memories and notable quotes! What holiday with friends would be the same without the in-jokes and memorable moments?
Inside my divided page-protectors I've used a mix of the fun journaling cards from Infocrea's Feu d'Artifice:

And here they are cut out and slotted in:

And a couple more:
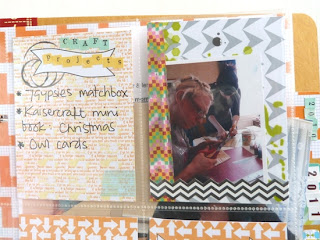
The tiny alpha stickers I used for the 'Craft Projects' title [above] and for some of my dates below are also by Infocrea [the particular colour-way I used is out of stock, but there's another option still available here]

I made the tabbed pages [above + below] using 12x12 sheets of the bright graphic double-sided patterns from the Feu d'Artifice range:

I made a few of these into pocket pages too - to hold more of those photos that we've all collated.
Let me show you how I made one particularly quick and easy pocket page from this 12x12"sheet :

My album is smaller than 12" so, rather than trim off a strip along the bottom of a full sheet of paper I simply folded it upwards:

As my pockets don't need to be super-strong I simply kept the folded flap in position using strips of washi tape wrapped around from the front to the back ... and voila! there's a pocket!:

You could also stitch down the sides if you wanted, or use brads or eyelets.
And here's the pocket in use, storing extra photos and those I haven't yet got around to sticking into the album:

And, not only is it a super-easy style of pocket ... it puts double-sided papers to such great use! You get to see both sides at the same time!
I hope you've found something here to inspire to go and get your craft on.
Happy crafting!
Julie
p.s: are you joining us in the '52 Weeks of Photos' project? I'm making another split-page-protector album to store mine!
This is fab Julie, I just love it. I might even have a go at making one myself
ReplyDeleteThanks Suzy - I'd love to see it if you do :-)
Delete