Tuesday 18 December 2012

Julie: using the *New* Alice Palace puffin stamp

Hello again.

Have you seen the new Crafty Individuals stamps Jean has in stock? They're designed by Alice Palace and they're are a fun new addition to the Crafty Individuals collection.
 
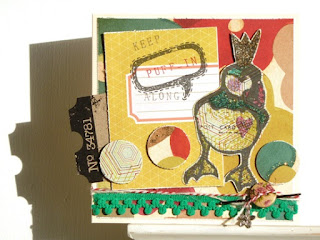
For my first play with them I chose to work with the lovely crowned puffin character:
And here's what I did with him: 
  • stamped him directly on to patterned paper using a dark grey dye-based ink pad;
  • coloured over the top with coloured pens to help define his beak, cheeks, feet etc;
  • then added some sparkle using Stickles.
And ... as he comes complete with his own speech bubble I gave him a little greeting to send as a 'get well' to a friend:
And here's how he turned out:

Products available from 3DJean:
And for the full range of new Alice Palace designs [which includes hares, geese, a robin, a bulldog ... and more ...] you can visit here.
 
Go see which is your favourite ... using a terrible coordinating pun for your sentiment is entirely optional!
 
Julie :-)

Friday 7 December 2012

Purple Onion...

Have some new stamps...a cute bird and a lovely heart banner..
The following instructions are just for getting you started, for making a base to which you can add any other bits and pieces...for example, rub-ons, gems, further collage items, glitter and any stamped images you like.

 
Paint your canvas with a layer of gesso.Take any mask and a credit card... scrape a layer of gesso over the mask, let it dry.

 
take a piece of paper from a book and glue at the top, wipe or brush some colour onto the paper and the textured bottom.Wipe another colour around the edges.

 
Cut out and add the house, stamp, colour and cut out the bird and the banner.

 
Use a piece of florists wire as the banner string, poke the ends through the canvas, use foam pads to stick on the hearts, stitch through the hearts and over the wire to hang the hearts.

add words of your choice.....
Everything you need (except the canvas) can be found here....

Tuesday 27 November 2012

Julie: Cardmaking using nostalgic Santa images

Hello again.

If you're looking for a quick no-need-to-stamp-or-colour-in image for your handmade Christmas cards then look no further than this 12x12 sheet of 'Images from the Past' featuring 15 fabulous nostalgic Santa's from Pion:  
I sat myself down with this sheet and, inspired by the various colourways across the individual Santas, I created a whole collection of Christmas cards:
But, although the images are very traditional in style and colour I decided to mix them together with some of my more modern alphabet stickers which I think really draw the colours out nicely.

Here's a closer look at a couple:
 Here the damask design backing paper is also a sheet of Pion called 'Christmas Poem' from the 'Waiting for Santa II'  range:
And the cluster of embellishments includes a decorative heart pin, a paper rose and a snippet of seam-binding:
The background to this one is 'Winterplay' by Pion:
 And another cluster of embellishments anchors the image down for a pretty focal point:
For me, they're a nice mix of soft vintage shades, modern alphas and a relaxed scrappy/shabby style [which is my favourite way to work!], which makes a change fom the usual strong bold red and green. 
 
Haing said that ...
 
I made lots of cards using these lovely nostalgic images several of which were indeed red + green! But I guess it goes to show how easily they can be adapted to whatever other colours and supplies you have on hand!
 
By the way ...

If you bought the sheet of the Pion 'Fairytale of Winter' festive children images from 3DJean earlier in the year then keep an eye out over on my personal blog over the coming days/weeks as I'll be sharing another set of cards using those [alas they're no longer in stock, but if, like me you hadn't got around to using yours yet, then there might be something there to inspire you.]
 
Thanks for stopping by today. Happy Christmas-crafting to you!

Julie :-)

Supplies available from 3DJean:

Tuesday 20 November 2012

A Christmas Themed Post Again

I think one of the best 12x12 sheets i've stocked this year has got to be these PION image sheets. The one with all the santa images on is the one ive used to make lots of christams cards this year like this one. The base of the card is one of the PION 12x12 sheets with the 4 different 6x6 patterns on them. I just cut the sheet in half and then glued the side and bottom together to form the pocket.   

Then decorated the front with santa , pearls , velvet ribbon and seam binding. A piece of card then pops inside the pocket card for you to write your greeting on.
Thanks Jean x

Thursday 15 November 2012

Jan; Three of a kind

Jean has these delightful vintage images by Pion. I've used them to create a Christmas triple easel card.
There are two other sheets in the range, Romance and Santas, both would work well with this style of card. I've used seam binding, heart pins and pearls  to add a bit of glamour. Sorry the photo is a blurry.  These images are so appealing.
 So if you are looking for a different Christmas card this year pop over to the shop and stock up with gorgeous goodies. If need another idea how to use these images the click  here  to see how Julie used her sheet to make a very feminine advent calendar,
Have fun.

Sunday 11 November 2012

A Change

For a change I thought I would do some scrapbooking. I still have thousands of photo's sitting around needing to be scrapped and put in albums. So this one is a very old one of me in Russia , so old I cant remember the year and will nedd to dig through things to find it out , which explains why it only says 198 for the moment.  

Ive used some of the  THE NOTEBOOKS OF THE HERBORISTE 12x12 papers . Love the the border sheet which I cut up and used lots of it on the layout , some white rub-ons where added , which were probably as old as the photo , couple of cabouchons and a nice white bow and strip of seam binding to pull it all together.   This is the border 12x12 sheet , how nice is it ?

Thanks jean x


Tuesday 6 November 2012

Julie: Paperclay Long Legged Robin

Hello, hello.
 
My project today shows one way in which you can use a product which really has an endless variety of creative uses: Creative Paperclay.
 
And here's what I made:
The original idea and instructions came from Effie and, in case you missed her original version, you can catch up here on her blog. A group of us sat down and worked on our versions using the same basic techniques, and all came up with something quite different in the end.
 
I'd never worked with Paperclay until I made this little chap, but it was really fun once we got started.  And he's deceptively simple to make.
 
His body began as a lightweight ball [like polystyrene] into which we pushed wire legs and then coated in a layer of the Paperclay.
The head is a solid rolled ball of the clay pushed on to a cocktail stick, then pushed into the body.
 
TIP: When moulding and stretching the clay [eg. to create the connection between the body and the legs, or to create a tail] keep some water on hand to dip your fingers into occasionally to help you smooth the clay along without dragging it.
We set the birds aside overnight to dry through completely and, the following day we sanded the bodies for a smoother finish and painted them with regular acrylics.
 
And, naturally we added wings ... and a crown!
 
And if you're wondering how far a packet stretches: between us our group made 8 birds and we only needed to break into a second packet for a couple of heads worth!
 
There' much more info about Creative Paperclay here on the 3DJean on the website
 
If you've been putting your Paperclay to good use already, or you're thinking of trying it out don't forget you can always:
  • Leave a link to or photo of your work on the 3DJean Facebook page OR
  • Leave us a comment here on the blog.
See you soon.
 

Thursday 1 November 2012

Me As Well

Yes I have been having a play around with the new Queen Kat stamps also. I've used the Gothic Girl stamp (no suprise there then lol) and made a card . The paper is some I had left from the French Christmas Range we have in stock.    
I added a bit of black seam binding , some flowers and a couple of heart pins.

Saturday 27 October 2012

Queen Kat...

Designs...new rubber stamps available here...a bird on wheels, how cute is that and a girl having a bad hair day..I love the fact that these are just stamp and go.... no colouring in! just a great whimsical images. They are blue rubber which looks a little thin but stamp onto a softer surface and the image is crisp and clear.
The cute little pencil pot is here...  Iv'e used the Pion Christmas papers to cover it.

Definately a bad hair day!
Effie
xxx

Thursday 18 October 2012

Just in case

you need reminding how many days to go to Christmas you might want to make one of these. All the materials are available in the shop but I'm not sure for how long.


  The house is actually a key holder by Tando and covered with these gorgeous Christmas papers from a French company called Infocea. I can't see them being in the shop for long so grab yours now.

Tuesday 16 October 2012

Julie: Wooden Countdown to Christmas


Hello again.
 
Did you see Effie's 'Little Houses' post a week or so ago where she decorated one of the wooden keyholders you can find in the 'Things To Alter' section of the shop?
 
Well, in it she hinted that there'd be some more ideas of how to customise them coming soon because, while you could certainly use the blank base as a 'keyholder' - as the name suggests - as a Design Team we've all taken a more festive approach and turned them into Advent Calendars / Christmas Countdowns.
 
Here's my version in a feminine, nostalgic, vintage style:
 
To create the look:
  • I painted the whole thing with a shade of cream acrylic paint.
  • When that dried I covered the front using the 'Winter Bird' patterned  paper design from the Pion 'Waiting for Santa II' range ... and began to embellish.
  • My main focal point is a vintage image of two well wrapped up little girls cut from the 'Fairytale of Winter' sheet in Pion's 'From Grandma's Attic' range.
As the finished calendar is a gift for my sister, this seemed like an appropriate image choice!
  • Once my image was in place I wrapped the front in lace and trimmings and added buttons and other festive embellishments.
TIP:
  • to cover over the front section where the 3 pegs stick out - you can just make out one of them in the bottom left here:
  • just measure / mark off where the pegs are on the back of a strip of patterned paper ... them simply punch out 3 holes [I used my crop-a-dile] and slip the paper over them. No fiddly cutting necessary!
  • My edging strips - including the ruler design came from the 'Christmas Poem' sheet.
  • I then added my countdown numbers to card stock tags, threaded them on to twine [so they can be easily flipped over each day] and hung them from the pegs.
And finally ...
 
.... these lovely little keyholders / calendars / houses [whatever you want yours to be!] come with a sturdy hanger already attached:

 So, as soon as you've finished your festive masterpiece you can hang it up and start counting down the days!
 
The 'wooden keyholders' are available here priced £2.50.
 
There'll be more Advent inspiration from the 3DJean design Team coming soon and, if you're inspired to interpret the wooden keyholder in your own unique way you're welcome to let us know:
  • you could drop back here and leave a comment directing us to your finished project
  • OR swing by the 3DJean Facebook page and link us up there.
 Thanks for visiting today, I'll be back in 3 weeks with a 'Creative Paperclay' project.
 
See you soon.


Saturday 6 October 2012

Little Houses...

not quite made of ticky tacky...... but cute all the same.

These little houses are key holders but you can decorate them any way you wish.. mine is done using papers from Pion in lovely subtle shades of blue and brown    


you can find the houses here


there will be more to come... I'm thinking along the lines of an Advent calendar so watch this space!

Monday 1 October 2012

Tando Blog Hop

“If you’ve arrived here from http://www.rosemarymerry.blogspot.co.uk , you’re on the right track. If you’re visiting our blog today for some other reason and you would like a chance to win some fabulous Tando Creative products, please joint the hop and start back at the http://www.tando-creative.blogspot.com . And it just so happens that the next stop on the hop is http://www.tando-creative.blogspot.com.


 For this blog hop I've used one of the lovely clocks in the Tando Creative range . This one is the cuckoo clock and i've stamped soem Octopode Factory images and placed one in teh little cuckoo hole and one at the bottom , some nice background paper, couple of rub ons and a packet of Hobby House self adhesive pearls and its sorted . All the clocks come with the mechanisms so they do really work and are easy to fit.   
Happy Blog Hopping   
Jean xx

Sunday 30 September 2012

Christmas at 3D Jean

This lovely kit from Tando Creative has just arrived all you need to add is a little paint and some of your favourite christmas paper. 

Lots of christmas chipboard packs arrived along with the Wreath Kit , these snowflakes just been one of the different Christmas packs now in stock. And a lovely Christmas tree printer tray for you to alter.


 Need some Christmas paper for those projects or 12x12 layouts , well we have two lovely Christmas ranges in stock . Just wanting to make Christmas cards well these Pion Waiting For Santa II are ideal , they are 12x12 sheets split into 6x6 piece so just waiting to be made into a card.

 And lastly for the quirky we have the fab Octopode Factory Christmas rubber stamps (there are still are a few from last years Christmas releases still in stock)
So its busy busy with all those cards and presents to make xx
Related Posts with Thumbnails