Tuesday 24 July 2012

Julie: Custom colour your seam binding

Hello again.

Did you know that Jean now stocks seam-binding in the shop? Well ... she does, and while it comes in lots of colours already, I like to experiment with dyeing my own to suit the projects I'm working on at the time. And it couldn't be easier!  

Here's how my latest experiment turned out:
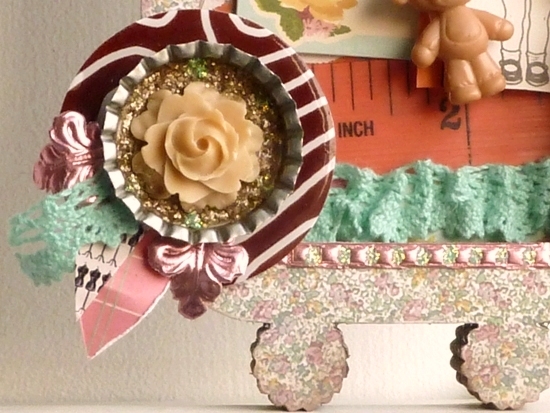
Here's a closer look:
And here's how I achieved the look:
  • I cut a length of Eggshell coloured seam-binding and laid it on a waterproof craft mat;
  • I then spritzed two shades of Shimmerz spray inks[a yellow and pale pink] directly on to the mat so if formed two inky puddles!
  • Next I dipped the seam-binding into the inks and kept moving them around and alternating between colours;
  • I spritzed any areas which didn't quite get a full covering directly from the bottle using the lighter shade - so as not to completely cover over the nice mottled effect;
  • I then crumpled the ink-soaked binding into a tight ball and left it to dry [or you could gently blast it with a heat gun];
  • Once it was dry I ran several strips of strong double-sided tape over my card base and, starting in the centre, wound the binding around in a circle, twisting it and turning it over to create folds, pressing it down into the adhesive as I went along;
  • Finally I covered the centre with a decorative button and added pins, pearls and flowers for finishing touches:
Supplies used - available at 3DJean:
So, why not have a go at custom-colouring your own seam-binding - all you need is a pale shade of binding plus ... any colouring medium and this doesn't need to be spray ink, you could also try out:
  • ProMarkers / Copics / Distress Markers etc;
  • Watercolours or any paint medium watered down;
  • Ink pads ... and anything else colourful you can think of [I'm considering trying natural dyes - like onion skins etc ... if I give ot a go ... I'll let you know!]
Happy crafting.

Julie :-)

Sunday 22 July 2012

Tweet!

How cute are these little bird houses!....just the thing for this little chap, he's made from paper clay, (you can find it here I had to trawl the tinterweb before Jean got some in the shop...Iv'e stocked up now) I just love that stuff, it's so versatile....his hat is just a cone of paper.


His house sits on a half polystyrene ball covered with map paper (I'm sticking everything on these at the moment...it makes a change from wheels!)


A bit of German scrap and a stamped tape measure finishes the base... which is an empty ribbon reel.


Hope you like it.


Effie

Tuesday 17 July 2012

Couple of hours knitting

New wool has arrived lovely pink , a light pink and a dark pink and more are on the site now. All you need is 1 ball of the wool to make these scarves and a couple of spare hours , yes 2 or 3 hours and you will have a lovely scarf knit. Great for those cold summer days , sorry I meant cold winter days. Or why not start knitting for christmas presents. Balls are only £6 , so get knitting.   

Thursday 12 July 2012

Jan:Hanging around

Today I'd like to share a door hanging I've made using those fabulous Pion papers. Now don't tell me you haven't drooled over them in the shop.  They're a must have at the moment so many to choose from but this time I used the For Father papers. There are patterns, plains, embellishments and border sheets all perfectly coordinated.

Absolutely ideal for those difficult man cards or projects.

Thursday 5 July 2012

Julie: Altered 'shrine' project

Hello again.

Today I've got a 3D project to share using the tall Tando Creative 'Mini Theatre Stage':
The structure itself is made from layers of board which you glue together to form a stand-alone structure:
And ... if I'd thought about it before hand, it would have been an ideal way to build up several layers of scenery behind my focal point:
  • by adding in a layer of decoration ...
  • followed by a layer of frame ...
  • follwed by another layer of decoration ... and so on, trapping the scene and incorporating fully into the structure.
Maybe the next one I make I'll remember to try it out!
Before glueing the top frame down, I covered it in 'Horizon' a patterned paper from the Lecon De Choses range and trimmed around the edge with my craft knife:
And, alongside some bits + bobs form my own ephemera collections, I added bottle caps, lots of cabochon and German Scrap foil trimmings:

The various Tando 'shrines' make lovely gifts which you can personalise and tailor to your recipient and fill with items that will mean something to them.  I gave this little scene as a gift on Mother's Day this year and she still has it out on display in the living room ... so I must have done something right!

Thanks for dropping in today. I'll be back here in a few weeks ... see you then.

Tuesday 3 July 2012

UKScrappers Blog Hop

Here is a photo of the supplies I used , a sheet of A4 card , matching papers  (I used the 12x12 Pion papers which are split into 6x6 different designs , making it ideal for this card) Some images (i've taken some off the new CD not yet on the website , but place an order before midnight tonight and get it FREE , it has over 1000 vintage ladies images on it. Then we have some embellishments again I used supplies from the shop , roses and pins and seam binding (yes we now stock seam binding)   

You now need to cut the card. Cut a 21cm x 11cm then score and fold at 7.5cm on the long side. The other piece needs to be cut to 20cm x 7.5cm and then scored and folded at 10cm. Choose you image and cut that out. 

Now cut out your pattern paper. You will need colour 1 paper a piece10.25cm x 7.25cm and a piece 9.5cm x 7cm . Colour 2 you will need 2 pieces 9.5cm x 7cm . Colour 3 a 10.25cm x 7.25cm .Colour 4 a 13cm x 10.25cm    


Then all you need to do is ink the edges , well only if you want to, I like inked edges. And start sticking the paper to your card. The 2 piece that are the same need to stick in the inside of the little card you have made of the 20cm x 7.5cm piece of card. The largest piece of paper needs to go on the large are of the large piece of card. The 10.25cm x 7.75cm goes on the opposite side.    

And then the 2 you have left go on the front of both cards.
 Now take the small card and stick it in the centre of the large card making sure that it opens on the left side (not the right like a normal card).Nearly finished , all you need to do now is add the image , I put some lace underneath before using 3d foam to give it some depth. Then added my seam binding down the side and the pins and flowers  
So here is the finished card with all the embellishments added. 


I've used one of the lemon Pion papers and made another one as they are quite quick to make once you have made one.

If you are visiting from the UKScrappers Sponsor Blog Hop after commenting (and BE SURE TO MENTION YOUR UKS USER NAME in your comment) hop on to  A sprinkle of imagination http://thebiskitbarrel.blogspot.co.uk/  . If you lose your way, hop to the UKS post  http://www.ukscrappers.co.uk/boards/showthread.php?p=6449785#post6449785}  to see the whole linked list. Be sure to reply in that thread when you complete the hop!
Related Posts with Thumbnails