Tuesday, 25 October 2011

Julie: ArtChix paper doll layout

Hello again.

My project today features a few of the newest additions to the 3DJean shop:
  • Art chix paper dolls and
  • Art Chix German Scrap borders and wings.
And here it is:
The paper dolls come on a sheet of cardstock and I had great fun deciding which outfit to dress mine in. In the end I went for tartan arms, flowery dress and harlequin style tights:
 What do you think? I also gave her a set of dragonfly wings plus copper German scrap set ... because a girtl can never have too many pairs of wings in her wardrobe can she?

Same goes for green wellies, of course!
 Although Jean no longer stocks the Shimmerz paints, if you do have any from when she did you might want to try sponging it through sequin waste to give a similar effect to spray inks - but with more control over where your colour goes.

Here's some of the German Scrap Renaissance Borders:
While they may not immediately spring to mind as a scrapbooking supply I think they work really well and combine perfectly with my mix of modern and vintage elements on this particular page.
Here's the products I've used today:

Thanks for stopping by to see my project, I hope there was something in it which you might take-away and put your own spin on. 

I'll be back here in 3 weeks time, but until then you can visit me on my blog: notes on paper

See you soon,

Jullie :-) 

Friday, 21 October 2011

Boo!

I love things in boxes and I love shrines..... these little shrines are fab. I inked and added some Disress Embossing powder and now it looks like rusted metal.
I punched small holes in the edge and glued some fab German scrap around the top.
More German scrap along the bottom. The tiny letters and patterned paper are from
Collection Elements.


Effie


XXX

Saturday, 15 October 2011

I've Been...........

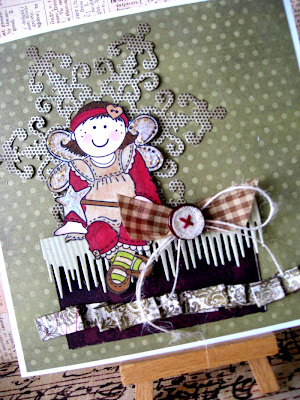
..hit with the cute stick again. I do like to get out of my box every now and again and makingcute cards do just that. I find this kind of thing so difficult so I set myself a challenge with this stamp.


She does have a mouth and I have to say they do stamp beautifully.


I'm not a great colourer inner but I did find it quite theraputic.


I think they turned out OK... but there'[s still room for improvement.


But for now I'm getting back in my box!


Effie


xxx

Tuesday, 11 October 2011

Bird houses


It's time for my third piece as guest designer......a little later than it should be but hopefully better late than never!
I took one of the Collections Elements small boxes and covered it with Collections Elements Antiquing Tissue


Next I took a some of the Collections Elements tiny houses and covered the fronts with scraps of the Studio2Mers papers and the backs with more antiquing tissue trapping thin flat sticks (coffee stirrers from places like Starbucks!) underneath it.
Colour the tissue and the sticks with black ink.


The next step is to stamp The Octopode Factory birds onto card and colour them and then cut them out. Next attach them to more coffee stirrer sticks.
Cut slits into the lid of the box and push the sticks through them arranging the houses and birds at differing heights.


Finally run a line of glue around the edge of the box lid and tip over some vintage glass glitter, leave to dry and then tip off the excess. Add some glitter to the card circles that come with the box kit and then glue these to the top of some of the houses.

Sunday, 9 October 2011

An Octopode Factory Christmas


So ive started on the masive task of Chrismas card making. And of course what else would I use except some of the Octopde Factory Chrismas stamps.

I also used papers from this years Basic Grey offering of Nordic Holiday. A great 6x6pad of papers and ive decided not use anymore pads until all this has gone as I am always left with half a pad of this and half a pad of that. Im sure you all know what I mean lol

Tuesday, 4 October 2011

Julie: Working chipboard and vintage items into a scrapbook page.

Hello there.

My project today is a scrapbook page featuring several embellishments and interesting vintage-themed items all available in the shop at the moment. For a full list of supplies just leap down to the bottom of my post.

Here's my page which tells the story of an old sign I spotted in Beamish which made me laugh [I've blogged more about the story behind it on my own blog today if you'd like to hear more!].

I began by layering up strips of patterned paper onto a patterned paper backdrop. Yes, I like patterns!

Next I added the illustrations and the snippets of wording all of which were taken from one of the vintage comic books Jean stocks. Finding appropriate images and words is one of my all time favourite ways to add to the story I'm telling on my page:
 
For more texture I covered two of the chipboard stars from Collections Elements with a mix of paint splodges, ink splatters and scraps of text from a Chinese newspaper.
Also in the top left of the photo above you can just make out the vintage food label I tucked behind my photo to add colour, shape and interest and to help make my photograph stand out.

The date is written on one of the labels from the Vintage Labels CD [which I printed off following the printing tutorial I blogged here].

For a little embellishment cluster at the top I layered scraps of paper with a chipboard frame from the Collections Elements micro-book pack which I'd added white paint and splashes of ink to:
I like my pages to have a lot going on, so the eye has somewhere to land on right across the page. I like to think there's not too much going on that it feels too busy though ... which is why I like to cluster my items together and leave at least a little so called 'white space' here and there!

 Here are the 3DJean supplies I used on this page:
InLinkz.com

That's all from me for another few weeks, as always, just leave us a comment if you'd like us to drop by and visit any of the projects you've made from 3DJean items.

Until next time, happy crafting to you!

Julie :-)

Monday, 3 October 2011

Sitting Ducks!

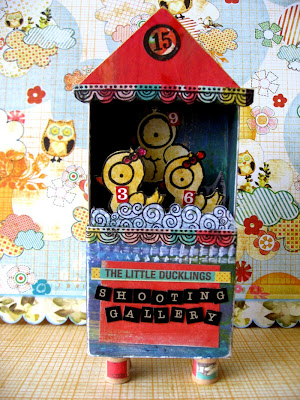
Just how cute are these little ducks?.....they reminded me of the ones you see in fairgrounds so it seemed only fitting to make a shooting gallery....no ducks were harmed in the process!


Take one household matchbox and cut the cover in half...cover with patterned paper, Studio2Mers


Cut a roof shape,make a shelf and stamp a curly border...Lost Coast. stick to the shelf.


Stamp and cut out your ducks and glue to the shelf and then slide into the half cover.Decorate your roof and stick to the top.


Add the words.. from Collection Elements
The feet are small cotton reels.


If you would like this little bit of nonsense then leave a comment saying so and a name will be chosen at random.


Effie


XXX
Related Posts with Thumbnails