Thursday, 30 June 2011

Jan: All dressed up

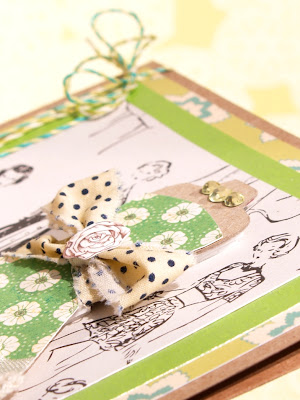
There seems to be a dress theme going around our design team this month. We hadn't discussed our projects, honest. First we had Gail's wonderful tissue manequin, then Julie showed us those Fabulous 50s frocks and now I introduce my "sixties" shifts. The dress in the front was made with the fabulous Studio2mers papers that Jean has in the shop.  They are so colourful and when you are a bit low on mojo they are a dream to work with.
Studio2Mers - Constellation - 6
I made this card with one of my favourite Sweet Pea stamps Telsa
The sentiment is made up from those oh so versatile Collection Elements lower case alphabets and finally I stamped the Bingo border stamp along the edge of the card and there you are a lovely quick card.

Tuesday, 21 June 2011

Julie : Fabulous 50s frocks!

Hi again.

Today's project is for those of you who managed to get your hands on the Collections Elements chipboard dressforms before they ran straight out of the shop door!

If you didn't manage to get them this time, keep checking back for re-stocks or else have a browse around the other blank chipboard shapes in the same range.

Now let's move on to the pretty dresses!
I dressed my bare chipboard shapes in fancy 1950s frocks made from patterned paper and ribbon.
To do this I:
  • cut a curve on a scrap of paper - for the neckline;
  • stuck it to the chipboard with double sided tape;
  • flipped it over and trimmed around the top half of the chipboard dressform;
  • finally cutting diagonally to cut a wide skirt shape.
I added a big bow at the waist, a ribbon and crochet trimming and a gem necklace, before mounting the shape on to 3D foam pads:
The 'Birthday' part of my greeting was cut from the Collections Elements 'Tiny Alphabet' sheets, while the 'Happy' was a word I spotted in one of the Vintage Comics in stock at the moment, which I simply cut out and popped on the card!
Here's a colour variation of the same idea:

Personally I like to often leave blank chipboard blank and find that the kraft card base and lettering I used for these cards helped tie it all together:

If you've made anything with any of the Collections Elements shapes, do let us know. It's always good to see other people's take on the same product.

See you next time, when I think I'll share somehting I'm making with the paper range which landed brand new in the shop last week: Studio 2 Mers.

If you like something a bit unusual, something a bit paint-y, art-y, journall-y and unique then feast your eyes here ... where the colours and designs are sooooo very different to the norm! 

Happy crafting.


Thursday, 16 June 2011

Isn't it.......

....great what you can do with a bit of tissue paper and wire!

this was an old dress form that had seen better days so it's had a makeover.


The petals are wire covered in this fab tissue paper from Collection Elements and spritzed with colour.


abit of lace and a few gems...

This is how to make tissue covered shapes...


Bend your wire to the shape you want...cut the tissue around half a centimetre larger and using PVA or Mod Podge fold over the edges... easy peasy!


Add colour with sprays or spritzes..and some Stickles!


Hope you like it

Effie

XXX

Thursday, 9 June 2011

Back In Stock

Yes that's right the House Configuration Box is now back in stock

How long for I don't know , so get them while you can.

Wednesday, 8 June 2011

Julie: Micro Accordian book

Hi there.
I just wanted to drop by to share a project I've made which might be of interest if you have:
I covered the heart and the frame on the book cover with texture paste and then acrylic paints:
 I used a heat gun to dry it and to create a 'bubbling' effect with the paint:
 Here's the finished book:
 Being such a small size, it becomes a real feast for the eyes as you can see all its pages at once!
I just wanted to quickly show you this here - in case you've been wondering where to begin on yours ... but over on my own blog today I've posted a lot more photographs of it, with close-ups, if you'd like more detailed shots. 

Just click here to see the full project.
Right, I'll duck away now ... it's not really my turn to be here today!
See you soon enough ... [when it is my turn!]

Julie :-)

Wednesday, 1 June 2011

Arrived

Lots of "NEW" Collections Elements products have arrived but the most exciting product for me are the lovely tissue paper packs.

"Antiquing Tissue". Comes in two styles, Victorian and Melange. The ease of applying it to odd shapes and "inside" areas of boxes and the like make tissue a really fun thing to use. This is a super strong tissue and the best part about it is you can colour it the way you want to. So you can "Antique" it with lots of things that you will already have at home or in your crafting cupboard.


As you can see from the sample above I have 'antiqued' the tissue in different shades of tea and added a touch of red colouring to the top piece. As you add a second and third piece, dilute your tea. Actually by wetting the tissue it makes it even stronger when dry, sounds weird but it actually does, so if you want the tissue white still wet it and allow to dry. You can colour it any shade to match your project using any number of re inkers, (water based ones) food colouring or you could add some misting power to get different tones on the one
Related Posts with Thumbnails