Showing posts with label dewdrops. Show all posts

Thursday, 13 January 2011

Jan:Pretty Lady

y

Isn't she gorgeous?
She is one of the new Sweet Pea stamps that Jean has got in for you to play with. I have coloured her dress with Distress Inks to tone in with the background paper.

She's definitely going to be one of my favourites will she be yours?

Wednesday, 23 June 2010

Speedy, Quick and Easy ...

Hello, today I want to share a couple of cards for those moments in life when you realise you have less than 20 minutes to make a card for someone because you forgot all about it. I can't possibly be the only one who has those 'panic panic, what will I do?' moments. No? I didn't think so :)

The first card is super simple to make. Everything I used came from Jean apart from the pens and border punch. Have a dig around in your scrap box (or like me use a couple of brand new sheets of paper) and select a couple of coordinating patterns. Trim paper to fit a blank card, cut a paper doilie in half and glue onto both sides of the papers, attach to the card with dimensional foam pads. Cut a strip of paper and add a decorative edge with dies, punches or something frilly, add this to the card with dimensionals. Stamp the doodled frame, cut out and colour with a marker, use a fine tip pen in a coordinating colour to fill in the spaces in the doodled lines. Stamp a greeting onto the frame, add a couple of pretty dewdrops, attach with foam pads and your card is done.  Time taken - 15 minutes!!

I used:
Happy Birthday stamp (may be out of stock)

My second card is just as quick. On your computer print a sentiment close to the bottom of the paper, trim to fit a coloured cardblank, adhere and attach a few sparkly gemstones. Use the Doodled Heart stamps to stamp a pattern block in coordinating ink, add glitter to some of the hearts and trim. Mat onto coordinating card and add a frilly border to each long side with a die, punch etc. Tie a matching ribbon around the pattern block and attach to the card with foam dimensional pads.  Tada! one finished card in no time at all :)  This card made, written and on it's way to the post office within 20 minutes. It was only after I popped it in the post box that I realised I hadn't taken it's photograph so I had to ring the recipient and ask them for it back!!


I used:
Doodle Heart Set stamp (I think it was probably designed to cut into seperate stamps
but I love using it as a large block so have kept mine in one piece)
Kaiser Rhinestones in Hot Pink (gorgeous!!)

Tuesday, 1 June 2010

A Touch Of Sparkle ...

As anyone who has read my previous posts will tell you I love glitter and sparkle and it just happens that Jean carries a whole range of products that help me maintain my glittery and sparkly reputation.  Today I want to share with you a little wall hanging project I made

First I stamped this beautiful Lost Coast image and coloured it with my markers

I then stamped another image, cut out the letter 'r', covered it with shimmerz paint and then layered it over the top of the original stamp. Set that aside to dry

Next I took a chipboard minibook that I've had in my drawer for a while in the shape of a postage stamp. The front cover had an inset panel that I removed and I used this as a templete to cut out a panel in another piece using a craft knife. I painted all the pieces with regular scrapbook paint

When it had dried I painted a combination of Shimmerz paints and Pixie Dust Blingz paint all over the front panel and when that dried I used a baby wipe to sponge another layer of Blingz.

I then stacked the three layers of chipboard together to make a sturdy frame, trimmed the stamped image to fit and because it was a slightly different shape to the inset panel I added some strips of patterned paper.  Then I added a row of the dewdrop glass embellishments all around the frame, added a couple of the Kaiser rhinestones to the bottom corner and made a hanging loop with wire and some beads I had in my craft cupboard


Thursday, 29 April 2010

They say it's your birthday ...

... well if it is your birthday today then I hope you have a very happy day, if it's not then you can still have fun by making this bold and bright birthday card.

Jean has some gorgeous sticker strips in the shape of flags and banners and coordinating 6x6 paper from the Sassafras range (sticker strips out of stock but I think she's getting more in) which I fell in love with and used to make my card

Step 1: Doodle an edge around your folded cardblank with plack pen - doesn't have to be straight doodles never are!


Step2: Cut one of the flag stickers to length and adhere to card, add a few of the smaller strips across the top
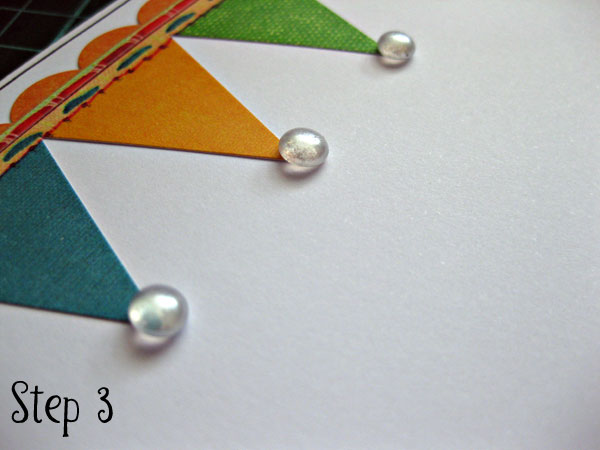

Step 3: Glue one dew drop on the bottom of each flag. I love these dewdrops and use them stacks as flower centres, on the corners of my cards and as little design extras to fill up the spaces on my cards. Even better - they last forever!!


Step 4: Tear lengths of coordinating paper into strips. Curl up the edges and glue together.

Now you could have a dig around your scrap box to find small scraps to make your paper strips with but everyone who knows me knows that I don't 'do' scraps very well at all so I was perfectly happy to break into new pieces of paper to make my torn strips. Ha Ha! I came out in a cold sweat just thinking of even keeping scraps :)


Step 5: Create a sentiment or greeting on your computer or use a rubber stamp - I would have used a rubber stamp but I couldn't find my black under under the mound of 'stuff' on my desk so made do with my computer and printer. Trim it, round the corners and doodle an edge around it


Step 6: Glue onto the back of your paper strips and then glue everything onto your card


Step 7: Glue a length of black rikrak across the paper strips and add a button tied with string or thread to finish your card


There you have it, a fun birthday card to make someone smile


And, just because I had all my tools and the rest of the paper out on my desk I made another card using the same paper as I love it so much

Have fun, Andrea x
Related Posts with Thumbnails