Showing posts with label Pion papers. Show all posts

Wednesday, 27 March 2013

Playtime...

...boys toys! sometimesyou may need more than a just card but not quite a full blown gift..this might fit the bill.It is just a box with an aperture cut in the front... (I used a Tim Holtz movers and shapers die...) a toy car mounted in the opening, decorated with these Pion papers..

The papers are 12x12 and have lots of bits and pieces to cut out... banners, borders, butterflies and tags.

 
I used as old pencil for a handle..


tha papers are great for square cards too as they are divided into four 6x6 sections.

you can get your paperpack here

Tuesday, 3 July 2012

UKScrappers Blog Hop

Here is a photo of the supplies I used , a sheet of A4 card , matching papers  (I used the 12x12 Pion papers which are split into 6x6 different designs , making it ideal for this card) Some images (i've taken some off the new CD not yet on the website , but place an order before midnight tonight and get it FREE , it has over 1000 vintage ladies images on it. Then we have some embellishments again I used supplies from the shop , roses and pins and seam binding (yes we now stock seam binding)   

You now need to cut the card. Cut a 21cm x 11cm then score and fold at 7.5cm on the long side. The other piece needs to be cut to 20cm x 7.5cm and then scored and folded at 10cm. Choose you image and cut that out. 

Now cut out your pattern paper. You will need colour 1 paper a piece10.25cm x 7.25cm and a piece 9.5cm x 7cm . Colour 2 you will need 2 pieces 9.5cm x 7cm . Colour 3 a 10.25cm x 7.25cm .Colour 4 a 13cm x 10.25cm    


Then all you need to do is ink the edges , well only if you want to, I like inked edges. And start sticking the paper to your card. The 2 piece that are the same need to stick in the inside of the little card you have made of the 20cm x 7.5cm piece of card. The largest piece of paper needs to go on the large are of the large piece of card. The 10.25cm x 7.75cm goes on the opposite side.    

And then the 2 you have left go on the front of both cards.
 Now take the small card and stick it in the centre of the large card making sure that it opens on the left side (not the right like a normal card).
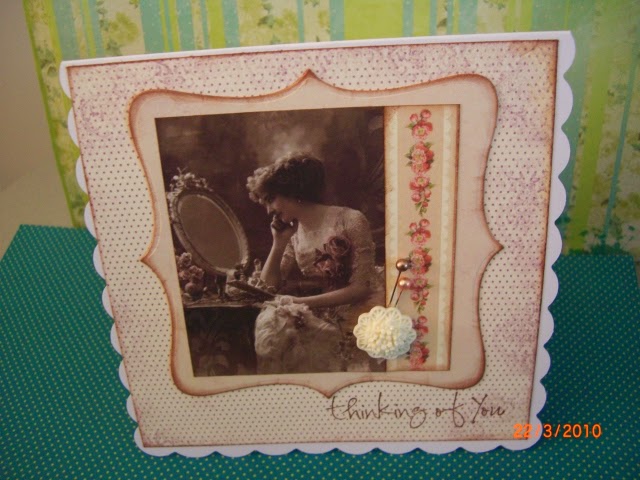
Nearly finished , all you need to do now is add the image , I put some lace underneath before using 3d foam to give it some depth. Then added my seam binding down the side and the pins and flowers  
So here is the finished card with all the embellishments added. 


I've used one of the lemon Pion papers and made another one as they are quite quick to make once you have made one.

If you are visiting from the UKScrappers Sponsor Blog Hop after commenting (and BE SURE TO MENTION YOUR UKS USER NAME in your comment) hop on to  A sprinkle of imagination http://thebiskitbarrel.blogspot.co.uk/  . If you lose your way, hop to the UKS post  http://www.ukscrappers.co.uk/boards/showthread.php?p=6449785#post6449785}  to see the whole linked list. Be sure to reply in that thread when you complete the hop!

Thursday, 28 June 2012

Jan: Drop down ...pop up a 3d card

I love structured cards despite the fact that I make loads of mistakes and end up with lots of scraps. The finished result is always worth it. This card was one of two that the lovely Claire Rowlands (Molly Bloom stamps) shared with us at a recent workshop. As you know I'm a poor colourer iner (my word for illustrator) so I substituted the images that needed colouring to one that was already done. Jean has these gorgeous vintage images in the shop and they are so versitile. Regular peeps will remember that  Julie used them recently to make some fab humourous  cards.

I've covered my card with a selection of those gorgeous Pion papers and adorned it with the fabulous Hobby House flowers,pins and pearls.
So many pretty things to play with in the shop so check them out. Happy shopping.

Thursday, 17 May 2012

Picture Perfect!

I really do like these vintage portrait pictures...if you want to make traditional vintage projects or add a little humour these images are perfect.

adding a little colour with distress inks adds to the hand tinted photograph look.


she looks like one tough cookie!


and as for Algy... well you can make your own mind up!


The papers for making this little shrine are found here....


Thursday, 29 March 2012

Jan: Take one sheet


of this beautiful Pion paper that Jean has in the shop along with these stunning images and you can create the most gorgeous cards.


This is a simple card using the papers and images and embellished with those lush cabochons.

 Next is a pretty acetate card which is tricky to photograph. 
You make a concertina card base by folding a strip of card (mine is 10.5 cm x 12cm scored every 2cms). Fold a piece of acetate 10.5cm x  28cm in half to form the cover. Make a hole in the top of the acetate so that you can thread through the ribbon. Stick one side of the acetate to the edge of the concertina base. Decorate a tag, thread through the ribbon and secure with a bow. Then stick down the other edge of the acetate to the base. I have used a decorative border to hide the sticky tape.  See easy peasy.
Finally a sandwich board card courtesy of my friend Jo .
These papers are a joy to work with. They are so pretty and such delicate colours. I know you will enjoy playing with them too. So don't dither they may not be in the shop too long!


Related Posts with Thumbnails