Showing posts with label Effie. Show all posts

Thursday, 27 February 2014

What's New?

These and these ....use them together with a few punches to make your own flowers
Punch out the flower shapes, clip to almost the center and use a round ended pen to add a little dimension to the flower. Place the shape onto a soft surface... a mouse mat or similar and rub each petal in a circular motion, this will break down the fibers in the paper and give it shape.


Layer up the shapes and add the stamens and the centers. I used the stamens as antenna on the butterflies too

Pretty!


I think I may add a little more bling to the bunny.. maybe a necklace.


and an eye!

Sunday, 5 January 2014

...Halfway there...you don't have to start a project at the beginning of the year, in fact you can join in with this one at any time, I started in August and have for the most part kept to my self imposed Sunday schedule.

Number 30, The other half


Number 40, numbers


Number 45, Someone in a hat.


If you would like to join in the 52 Photos project then you can find the list  here...

Sunday, 22 December 2013

Open The Box...

... need some handles...then you can find them here. and the door knob too! Just the right size for this little cupboard.


The papers are Graphic 45.
Effie

Wednesday, 13 November 2013

Twinkle Twinkle...

....Little star..I've dug out this old Sizzix 3D star die.. ( Tim Holtz has a newer version ).. and used some  Pion papers 

The glittery trim is a cheap garland from The Range, chopped up and coloured blue with alcohol ink.


Effie

Sunday, 27 October 2013

Shrine On!

....A crown and wings... what more could you want. You can find these little shrines here. I've used gilding flakes  for the crown and wings and an image from the Artchix faux stamp sheets... it's out of stock at the moment but you could make a Christmas shrine and use these


If you like her wooden ruler necklace then you can get that here.

Effie.

Wednesday, 18 September 2013

A Little Bit Of..

Texture goes a long way...This stuff is great, no more adding colour to gesso or white texture gel, it does what it says on the tin! On this tag I used the Gummy Berry Bear mixed with Tidy Widy.... only because I didn't clean the stencil between colours... how lazy is that but I love the colour.


The images are from Artchix.. you can find them here..


I used a chevron stencil on this tag with the Jelly Bean Green and the Artchix house image sheet


Houses again with Gummy Berry Bear. through a dotty stencil.


Thursday, 22 August 2013

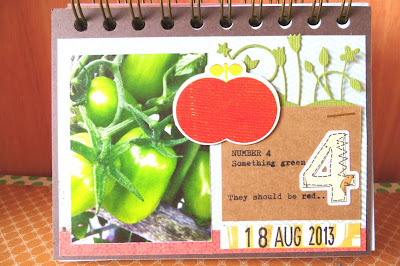
Number 4... Something Green

...and they're very green, no sign of turning red..


Green tomato chutney anyone?


Wednesday, 14 August 2013

Number 34

... this is the second week and  number 34 on the list...
WHAT'S IN THE FRIDGE... a lot! getting ready for a bit of a 'Do'....there's a lot of food but not much drink... that's in the 'beer' fridge elsewhere.


Alas no beer for me since the A&E incident...


Two down fifty to go....
Effie

Monday, 29 July 2013

52 Pictures....

.....Last year I undertook two year long projects... Julie's month in Numbers and Photo Friday.. and I completed them both!... this year I decided not to commit to anything.. this was fine at the beginning of the year but we're now halfway through the year ..... and I hate to say it but I miss not having a deadline... I work better under a little pressure but don't tell anyone that! So Jean has a plan..a photo a week.... there will be a list posted shortly.The subjects don't have to followed in any particular order as long as you document one a week.This is how I'm going to document mine... an easel type flip book so here's the instructions.


Chipboard...2 pieces 11x14 cm, 2 pieces 3x11cm....glue to your paper, fold over the edges and glue down.Take a strip of contrast paper and cover the underside...make sure you press well in the gaps..this needs to form a hinge that will fold without tearing the paper.


Cut one more chipboard piece 11x14.. this will be the front cover.. cover both sides. Cut 26 pages 11x14 from cardstock.


Use a BIA, Cinch or book rings to bind...


Decorate your front cover...


             I'll decorate each page as I add the photograph... hopefully printed on a Pogo...


If you feel like joining in then leave a comment with a link so we can come visit!

Wednesday, 29 May 2013

Be Still...

... my beating heart!

 
I think Iv'e been hit with the lavender stick and may have to lie down in  a darkened room! Lavender is not a colour I use very often ( twice in a week!) and considering I have a button phobia it's a wonder this project happened at all!

 
It's a 6x6 inch canvas... painted with lilac acrylic paint, the edges daubed with Viva Croco in gold.... I was too impatient and dried it with a heat gun... the result.. not much crackle so I wiped some of the still sticky paint  off.

 
I stamped the dotty stamp and embossed it in gold, stuck it to a chipboard heart and stitched buttons onto it. Strips of gold faux mesh tinted with a purple Pro Marker surround the heart. 

 
The heart is mounted onto an old book page and glued to the canvas....

Friday, 10 May 2013

Peony or Anenome?

...either way difficult to spell but easy to make...


I used the Tim Holtz tattered Flowers die and this double sided patterned paper...and at  70p a sheet it won't break the bank.Cut 4 in the large flower for the top, 4 smaller flowers for the centre and 4 large flowers for the lower layer in a contrast patterned paper


Fold each flower in half and then quarters... use a hot glue gun to glue together, this is quicker than using wet glue (if you use wet glue use a peg to hold until dry).


You may have to tear some petals to make them lie flat...Curl your petals

 
Punch a circle... glue one set of four flowers to the circle. Glue the smaller flowers inside this set of four.Turn the flower upside down and glue the contrast flowers to the circle..the petals should curl in the opposite direction.


Make a hole in the centre... push a piece of florists wire through, bend the end.

 
Secure with hot glue and add aflat back gem..

 
Peony or anenome.... you decide.

Friday, 26 April 2013

Just...

... a few cards using Les Editions Infocrea....6x6 papers. lovely bright pinks and turquiose, something just that little bit different.

 
Love the pink check.


Wednesday, 27 March 2013

Playtime...

...boys toys! sometimesyou may need more than a just card but not quite a full blown gift..this might fit the bill.It is just a box with an aperture cut in the front... (I used a Tim Holtz movers and shapers die...) a toy car mounted in the opening, decorated with these Pion papers..

The papers are 12x12 and have lots of bits and pieces to cut out... banners, borders, butterflies and tags.

 
I used as old pencil for a handle..


tha papers are great for square cards too as they are divided into four 6x6 sections.

you can get your paperpack here

Related Posts with Thumbnails