Showing posts with label Glitter and Sparkle. Show all posts

Wednesday, 19 January 2011

Love token

Need to make a little something for Valentines Day? How about Ryla from Sweet Pea.


Simply stamped,coloured and mounted onto a chipboard heart which has been sprayed with Shimmerz.
And edged with the fabulous glass glitter.

Real cute!
Effie
XXX

Wednesday, 14 July 2010

It's Never Too Early!

...........................For Christmas!....
I'd searched and searched for vintage glass glitter and the nice lady at 3djean said if she could find some then she would get some........and she did! it's fabulous stuff!
So what did I make... a vintage snowman and here's how.

Take two different sized balls, these can be made of anything, these are compacted cotton paper. Cover in PVA glue and roll them in that fabulous silver chunky glitter. Gather a few twigs ( for his arms), paint them white.
Sarpen the end of a twig and colour the tip orange, cut off the end.. (for his nose) Take two black headed pins and snip to about .5cm For his hat.. cover the cap of a glue stick with black card, cut a larger circle for the brim and glue together
Using a cocktail stick about 3cm long push half in his head and the other half in his body, stick in his eyes and nose. Sharpen the ends of his arms and glue in the body. Add some small buttons. Give him a scarf made from any kind of fibres or ribbon. Using a small length of dowel mount him on a square block of wood...........or use a cotton reel to sit him on ( this was my first intention!)


And there you have it!


Or how about a Halloween cat!. he is made using the fine black glitter and he has a tail made from string dipped in glue and then glitter!

Hope you like it!
Effie
XXX

Wednesday, 23 June 2010

Speedy, Quick and Easy ...

Hello, today I want to share a couple of cards for those moments in life when you realise you have less than 20 minutes to make a card for someone because you forgot all about it. I can't possibly be the only one who has those 'panic panic, what will I do?' moments. No? I didn't think so :)

The first card is super simple to make. Everything I used came from Jean apart from the pens and border punch. Have a dig around in your scrap box (or like me use a couple of brand new sheets of paper) and select a couple of coordinating patterns. Trim paper to fit a blank card, cut a paper doilie in half and glue onto both sides of the papers, attach to the card with dimensional foam pads. Cut a strip of paper and add a decorative edge with dies, punches or something frilly, add this to the card with dimensionals. Stamp the doodled frame, cut out and colour with a marker, use a fine tip pen in a coordinating colour to fill in the spaces in the doodled lines. Stamp a greeting onto the frame, add a couple of pretty dewdrops, attach with foam pads and your card is done.  Time taken - 15 minutes!!

I used:
Happy Birthday stamp (may be out of stock)

My second card is just as quick. On your computer print a sentiment close to the bottom of the paper, trim to fit a coloured cardblank, adhere and attach a few sparkly gemstones. Use the Doodled Heart stamps to stamp a pattern block in coordinating ink, add glitter to some of the hearts and trim. Mat onto coordinating card and add a frilly border to each long side with a die, punch etc. Tie a matching ribbon around the pattern block and attach to the card with foam dimensional pads.  Tada! one finished card in no time at all :)  This card made, written and on it's way to the post office within 20 minutes. It was only after I popped it in the post box that I realised I hadn't taken it's photograph so I had to ring the recipient and ask them for it back!!


I used:
Doodle Heart Set stamp (I think it was probably designed to cut into seperate stamps
but I love using it as a large block so have kept mine in one piece)
Kaiser Rhinestones in Hot Pink (gorgeous!!)

Sunday, 6 June 2010

Man Cards ...

I don't know about you but I often struggle with making cards for men.  Little boy cards are fine, teenagers and even young men I can cope with but when they get a bit older - like Dad age - I suddenly find myself in the realms of those awful cards that your Aunty Gladys sends to your Dad with pints of beer, footballers and sailing boats on the front - I'm sure you know the kind I mean.  When I look at my small amount *ahem* considerable okay them ever increasing :) stash I see flowers, pretty colours, glitter, sparkle and in general lots of feminine embellishments and papers so perhaps this is why I struggle with male cards.

So, I set myself a challenge to make some cards for men and off I went to rummage through the shelves of Jean's shop. It didn't take me long - in fact I just clicked on the New Products link - to find some really lovely papers and stamps that I thought might make some nice cards and this is what I did.

My card


I used the Music Background stamp to create my own background paper and stamped in brown ink onto kraft cardstock, then cut it out, layered onto black card and stitched around the edge with my sewing machine. Then I used foam dimensional pads to adhere it onto a white folded cardblank


I loved this black and cream spotted paper from the October Afternoon Thrift Shop paper pad so trimmed a smaller piece, layered onto more black card and stitched around the edge. I used a Making Memories slot punch to create a hole, threaded the ribbon through (who said male cards can't have ribbon?) and tied it in a knot


After using foam pads again to adhere the panel I then created a greeting with the Birthday Wishes sentiment stamp, trimmed and then layered onto the scraps of black cardstock


As a final touch - and because a card just isn't a card without some glitter and sparkle! - I added 3 black Kaisercraft rhinestones to balance the design


I hope you're feeling inspired to make those men in your life some of their own cards, love Andrea x

Friday, 16 April 2010

What To Do With a Lumpy Bumpy Card ...

... Or, that's a lovely card but how are you going to get it in an envelope?????
Have you seen the gorgeous Webster's Pages paper pads in the 3DJean store? Mmmmmm, totally delicious. I used some of the papers from the Collection Triple Pack which includes the seaside retreat, garden gala and nature's storybook collections.
Here is the card I made using the gorgeous papers, some felt, hand stitching, a paper rose and a bit of paper curling which is my newly found addiction. I recently discovered Stacey Cohen's blog and love how she incorporates paper curling into her projects.
Anyway, I made this card at our last crop day. I drew the big flower shape onto the back of the paper, cut it out and then glued it onto felt before trimming around it and adding some stitching around the petals. The paper rose is just a circle shape cut from paper then cut into a spiral, twisted around and glued with glossy accents at the bottom to anchor it. I poured glitter into the flower to cover the glossy accents then just tipped the excess out when the glue was dry. When the card was finished I gave it a generous spray of Shimmerz Spritz to give it some subtle sparkle.
Once I had finished my card I sat there contemplating the beauty of it - as you do at crops when you actually manage to fit some crafting in between chatting and eating and even more so when you actually finish something!! when I heard a voice from the other end of the table (Jean)

"that's a pretty card, don't know how you're going to get it in an envelope though?"
Easy I said, I'll make it a box :) and this is how I did it ...

From cardstock cut two shapes like this, fold along the lines - this is where a scoring tool and board comes in handy but if you haven't got one then use a ruler and a blunt pair of scissors to score


You'll have two pieces of cut and folded card, one running across and one running upwards


Tape the folded flaps of the piece that goes from side to side (the first piece in my photograph) and join to the other piece making sure the flaps are in the inside of the box, tuck the flap in at the bottom and tape that too. The big flap at the top goes on the outside and will be decorated.

Now you'll have a plain box

Trim and glue coordinating papers to cover the front, back, sides and inside too

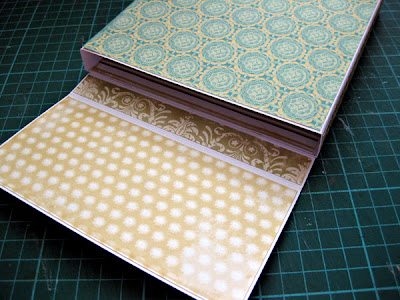


Add some embellishments to the flap using the scraps from making the card and the box and tie a pretty ribbon around from top to bottom which will keep the box closed. I sprayed my box with more of the Shimmerz Spritz to give it just that little bit more glitter and sparkle :)


My card


My box

My finished project


Supplies:
Webster's Pages paper pad and Shimmerz Spritz from the 3DJean shop
Martha Stewart border punch
Felt
Scalloped circle punch
Embroidery cotton
Rikrak
Papertrey Ink sentiment stamp, ribbon and flowers and scallop die
Glitter
Glossy Accents
Glazed brad
Have fun, love Andrea x
Related Posts with Thumbnails